Nothing is more frustrating than spending months turning and drying your wood creation, only to find that a small crack has appeared somewhere in the drying process. Because wood is so temperamental, it can be hard to figure out exactly where in the turning or drying process something went astray and why you’re continually getting cracks despite your efforts.
If you’re new to woodturning or have been repeatedly experienced cracking in your projects after turning, it’s necessary to understand what causes wood to crack. Only then can you understand how to prevent cracking from occurring after turning has been completed, which will be discussed in detail below. The following list will outline the most effective ways to prevent cracking before and after turning so that you can create flawless designs time after time.
If your wood keeps cracking after turning, follow these guidelines to prevent cracking in the future:
- Choose the Right Type of Wood Before You Start Turning
- Turn Your Piece Faster for Better Results
- Keep Your Walls and Bases Even
- Avoid Creating Too Much Friction During Sanding
- Let Your Piece Dry Using the Paper Bag Method
- Know the Appropriate Speed-Drying Techniques
What Causes my Wood to Crack After Turning?
Despite its beauty, wood can be a difficult product to work with due to its sensitivity to temperature change. Even the slightest variations in weather conditions can turn your wood creation from a flawless masterpiece to a crack-filled disaster. If you’re continually experiencing cracked wood after turning, the following conditions may be the culprit:
- Your Piece was Exposed to Too Much Heat
- Your Piece was Dried Too Quickly
- Your Piece was Exposed to Too Much Humidity
Your Piece was Exposed to Too Much Heat
When it comes to woodworking, heat is going to be your worst enemy. During every step of the process, you should do everything in your power to keep your blank and design away from extreme fluctuations in temperature and hot or humid air. However, this can be particularly hard to do during the sanding and drying processes, both of which expose your freshly created design to undesired heat. If you expose your piece to a sudden blast of intense heat, you will likely end up with quite a few cracks.
Your Piece was Dried Too Quickly
Wood must be dried very slowly from the inside out and should not be exposed to artificial heat. However, the natural drying process can take months or even years to complete, and sometimes an alternative method of drying is necessary. Even this process needs to be highly controlled, or the sudden exposure to heat will cause the outer layers wood to dry too quickly to support the pressure from the inner layers of wood, resulting in fissures.
Your Piece was Exposed to Too Much Humidity
Besides heat, your wood creations other worst enemy is moisture. If your newly turned wood isn’t able to fully dry, the outer layers will put increased pressure on the inner layers of wood and result in cracking. That’s why it’s important to store wood in a cool, dry place where it doesn’t have any chance of being exposed to moist air from outside.
How do I Prevent My Wood from Cracking After Turning?
Preventing your wood from cracking after turning starts far before you begin the actual turning process. Every step in the woodturning process, from cutting your log properly to storing your freshly turned design in the proper conditions, is equally important in preventing cracks from forming. The detailed instructions below will help guide you through the crack prevention process from choosing your wood to drying your final product.
Choose the Right Type of Wood Before You Start Turning
Even if your wood cracked after the turning process is complete, the damage may have already been done before you even created your blank. The type of wood you choose and how you prepare it can play a major role in the likelihood of your final product cracking. Follow the steps below to ensure that you’ve chosen the best type of wood and prepared it properly to help prevent cracking in your final product.
- Use Green-Wood Instead of Older Wood
- Always Cut Take More Log Than You Need
- Split Your Log in Half as Soon as Possible
- Store Your Wood in a Cool, Dry Place
- Let Your Piece Dry Using the Paper Bag Method
- Know the Appropriate Speed-Drying Techniques
Use Green-Wood Instead of Older Wood
The term “Green-Wood” refers to wood that is unseasoned and has very recently been harvested. It is the preferred type of wood for most woodworkers because it is much softer and easy to manipulate than older wood. Wood dries as it ages, making it harder and more difficult to work with using basic hand tools. The more difficult it is to manipulate the wood, the more likely you are to create cracks. Using green wood will allow you to work the wood more gently, making it far less likely you’ll get cracks.
Always Take More Log Than You Need
Once you’ve chosen the right log for your blank, you’d be wise to cut a longer piece than is necessary. If cracks develop on the edges of the log when it starts to dry out, you can simply trim them off with a saw until you’ve reached a part of the wood that’s crack-free. As a rule of thumb in the woodworking world, you should cut the log at least 6 inches longer than its diameter to ensure that you’ll have enough extra wood to trim away.
Split Your Log in Half and Seal it as Soon as Possible
Once you have your log, you should do your best to split it in half as soon as possible. This will remove a significant amount of pressure on the inner growth rings of the log. Without the pressure bearing down on them from the outer growth rings, the inner rings will be far less likely to crack under the tension.

In addition, you’ll want to seal (using a wood sealer) the end grain so that the moisture doesn’t escape too quickly putting stress on it and causing it to crack. I know many people who use melted wax and some latex paint, but personally, I prefer Anchorseal. It was specifically designed for this task.
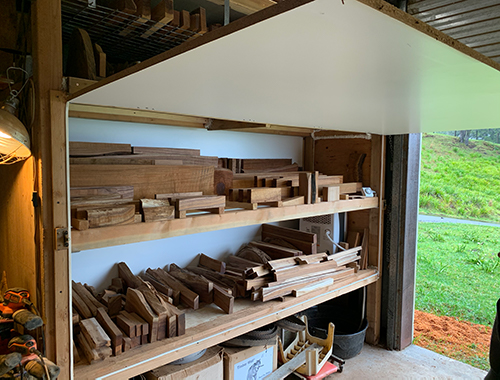
Store Your Wood in a Cool, Dry Place
If you’re not turning your blank immediately after it’s been cut or if you have additional green wood blanks that you’re storing for later use, you need to make sure it’s stored safely and properly. Any extreme heat or humidity will cause your wood to dry out and be much more likely to crack. Keep green wood stored in a cool, dry area where it will not come into contact with any direct sunlight. This will prevent the wood from being exposed to heat or extreme temperature changes and reduce the possibility of cracking.
Turn Your Piece Faster for Better Results
If you discover cracks in your piece after turning have been completed, you may have moved through the turning process too slowly. Once freshly-turned areas are exposed to the air, they begin to lose moisture much more quickly than the internal areas that are still unexposed. The increased pressure on the internal wood can result in significant cracking if it’s not removed or exposed promptly. The faster you work; the less pressure will be placed on the internal elements that could result in cracks down the road.
If you do find that your work must spend multiple days or weeks on the lathe, wrap a damp paper towel over the outside of your piece and cover it tightly with a plastic bag. This will keep the outer layers moist and even out the pressure on the inner layers until the project is complete.
Keep Your Walls and Bases Even
If you’re turning a hollow object such as a bowl or a vase, keeping the thickness of the walls even throughout is going to be hugely beneficial to avoiding cracks after turning. The walls of your bowl will dry differently if their thickness is varied, which will cause additional pressure and cracking. And while it may be tempting to want to provide your bowl with a solid, heavy base, beware the consequences. If it’s too thick in comparison to the walls, it will dry much more slowly and result in cracking.
Avoid Creating too Much Friction During Sanding
Even if you’ve made it through the turning, you’re far from being in the clear. One of the first potential pitfalls to a crack-free result is the sanding process. Friction from a power sander can build incredibly fast, causing the surface of your object to heat up too quickly and begin to crack. If you’re using a power sander, slow down the rotation and only spend a minimal amount of time – ideally 1-2 seconds – on each area before moving to the next to avoid heat buildup.
Let Your Piece Dry Using the Paper Bag Method
The most critical period for avoiding cracks is the drying period. Green wood should have a slow and controlled drying process that allows the piece to dry uniformly. One of the most effective ways to do this is to store it in paper bags. Place your object inside a large paper bag and loosely close it. Place this bag within one or two more paper bags and store your piece in a cool, dry place. The bags will soak up the moisture from the wood, allowing your piece to dry slowly and evenly. This also ensures that no cracks will occur from trying to speed up the drying process by using heat.
Know the Appropriate Speed-Drying Techniques
Fully drying a green wood piece can take months or even years. Sometimes, that length of time just isn’t going to cut it. If you need to dry a wood piece in a timely fashion without getting any cracks, try one of the following quick-drying methods:
- Use the Microwave Method
- Make a Homemade Kiln or Dehumidifying Chamber
- Use Desiccant
Use the Microwave Method
If you’re short on time and need your project to dry quickly, look no further than your microwave. Simply place your piece in the Microwave and set it on High for 20-30 seconds. Let your piece rest for at least a half-hour afterward, and then repeat the process until it is completely dried. You can do this process over many weeks or complete it in a few days with less resting time in between nuke sessions. Nonetheless, the longer it takes your piece to dry, the less likely you’re going to get cracking – so spread out your drying time as much as you can!
Make a Homemade Kiln or Dehumidifying Chamber
A slow-drying kiln is a great way to speed up the drying process of your piece without a major risk of cracking. If you don’t have access to a kiln, you can make a homemade one relatively easily out of an old fridge or an insulated cardboard box. With appropriately placed vent holes the proper light bulb, you can decrease drying time from a couple of years to a couple of weeks. If you have the time and interest, making a homemade kiln can be a fun way practice a new method of drying your pieces.
Another homemade remedy is creating a dehumidifying chamber. Similar to a kiln, but rather than using heat to dry out the wood, a dehumidifier is used to remove moisture. This method is very effective and my personal preference, however, it can remove moisture too quickly and cause cracks for which you’re trying to avoid. To make a dehumidifying chamber work for you, you should let the wood dry using natural methods until the moisture content is down to 20-25%…then place it in the chamber for the removal of the remaining moisture.
Use Desiccant
Believe it or not, this commonly used drying agent can even work its wonders on your wood designs! Although it’s not the most cost-effective method, you can find desiccant in bulk fairly easily. Once you have your desiccant, place a layer of beads in a sealable plastic bag, followed by your wood piece. Cover it with desiccant until you can no longer see it, then seal the bag completely. It’s important to make sure the desiccant isn’t coming into contact with any outside air, or it will suck up the moisture and throw off your drying process.
Desiccant beads change color once they have been saturated with moisture, so you’ll be able to physically see the drying process occurring. If your desiccant beads have changed color but your piece is still not dry, simply place the beads on a baking sheet and put them in the oven at 250° until they are fully dried out. Then place them back in the bag with your wood piece and repeat the process until it’s completely dry.
My Wood Cracked Anyway – What do I do Now?
No matter how much time and patience you put into your project drying, you may end up with a crack anyway. But don’t panic yet – there are still ways to salvage your cracked design without throwing in the towel. If you ended up with a crack, try one of these techniques to patch it up or turn it into a creative accouterment to your current design.
- Fill the Crack with Glue and Lacquer
- Decorate the Crack with Clear or Colored Epoxy
- Reinforce the Crack with Other Materials
Fill the Crack with Glue and Lacquer
If your project dries with a small crack, consider yourself lucky – you can patch it up with a little glue and a lacquer finish. With this particular tactic, you’ll use sawdust to fill in the crack so that it blends with the surrounding wood. If your project has one or more small cracks, follow the steps below to achieve a seamless patch job.
- Spray around the crack with a clear spray-on lacquer and let dry for a few minutes
- Pack the crack with a very fine layer of sawdust
- Drip a layer of CA Superthin Glue into the crack
- Rub more sawdust over the crack
- Spray the crack and surrounding area with CA Instant Set Accelerator
- Sand the area until it’s smooth
Decorate the Crack with Clear or Colored Epoxy
If your crack is too large to fill with glue and lacquer, don’t fret. Celebrate the imperfections of your work by filling cracks with clear or colored epoxy for a unique and beautiful look that may turn out better than your original concept! Follow the instructions below to create a beautiful epoxy fill that will bring a new character to your wood.
- Mix Two-Part Epoxy according to the directions on the label. If adding color, mix in as well.
- Apply the mix across and inside the crack and let dry according to instructions.
- Turn or sand the area to smooth and finish the design.
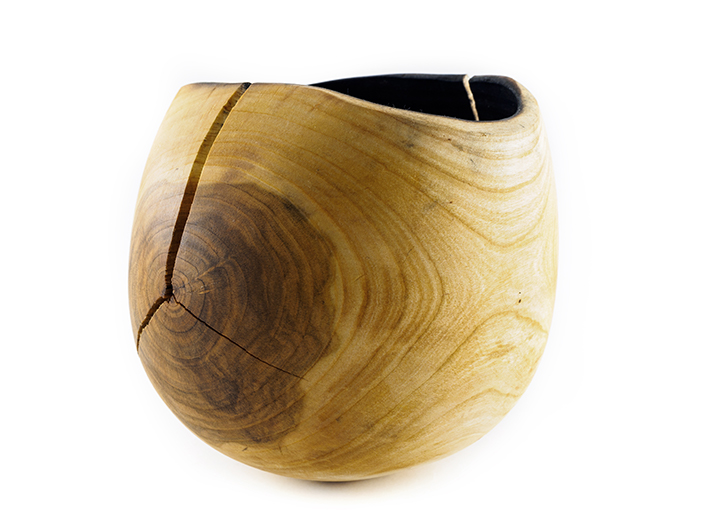
Reinforce the Crack with Other Materials
This technique is another creative way to repair and cover a crack while adding a unique decorative character to your project. Essentially, you will “patch” up your crack just as you would a pair of jeans. Simply drill two small holes on either side of the crack, and then stitch the crack using a material of your choice. Fun options for stitching cracks include:
- Leather String
- Colored Thread or Yarn
- Fishing Wire
- Small Chain Wire
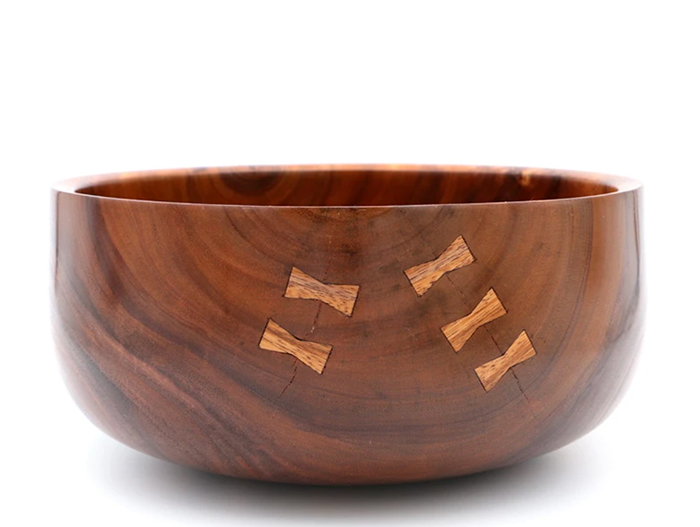
Butterflies are always an attractive option and in my opinion, add value to the piece. For example, in the picture above, I was able to increase the bowl’s selling price because of the added labor and art that went into creating the bowl.
Whatever material you choose, you’ll be able to create a unique and striking design that you may never have considered previously. Ultimately, your wood piece should be a celebration of its natural beauty, blemishes and all. If you choose not to obsess over the small imperfections and instead focus on celebrating them, you may find that the cracks you were so disappointed to discover ended up being the most beautiful part of your design.